
The software will also help you record the selected windows, full screen, and the users can also select a specific area of recording. Users can also take screenshots, draw and also add tex, and add text duringthe logo to the screen recording. If you have a YouTube channel, you can take advantage of the YouTube Creator Studio to film a screen recording. This requires using the live stream feature, so it’s not a great fit for everyone, but it could work out in some cases. This article explains how to enable screen recording to record your screen on Windows 10 using the Windows Game Bar or PowerPoint. Instructions cover Windows 10 desktop and laptop computers.
After pressing the key, you will have to open the program Snip & Sketch, Paint, Photoshop, or other software where you can paste https://driversol.com/drivers/bluetooth-devices/broadcom/bcm20702a0 the capture. The Windows 10 Lock Screen features the time, date, and other data from the apps you choose. Windows 10 has a couple of screens to navigate through before getting to the desktop. First is the lock screen and then the login screen.
Method 3: Using the Snipping Tool to Take Flexible Screenshots
In fact, it may be the most basic screenshot program available. Immediate sharing is still a pain in the butt, so we wouldn’t recommend this screenshot program for those who need easy and secure access to their captures. But, if you’re looking for a quick screen snip (especially if you want to do a free-form selection), this app will work just fine. As soon as you’ve captured the screenshots on your Dell device, your image would be copied to the Clipboard. Further, you can paste the same into any graphics editing software and save it.
- Select the Bluetooth device you want to add from the list.
- Keep in mind that this method will create a screenshot of an entire screen.
- Whether you want to record video alone or want to record video with sound, the following solutions can give you what you’re looking for.
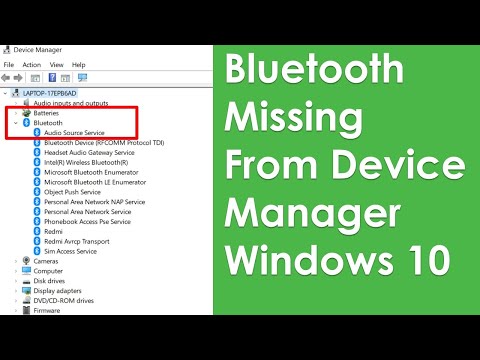
Right-click on it and click “Enable” to make the device functional again. This will turn on Bluetooth on your Windows 11 PC. Now, go through the first or second sections above to use Bluetooth. Now, click on properties and then click on startup in the drop-down menu.
The Control Panel application is the primary place for various Windows settings controlling Windows looks and feel, and behavior of other software. The Control Panelapplets configure field and number separators in Excel (you can switchsemicolon to comma, comma to semicolon, comma to point, etc.) ormeasurement systemin PowerPoint. Press Windows+Shift+S to create screenshots very easily and fast.
Way 1: Take a screenshot using Snipping Tools
Most new operating systems come equipped with some sore of screen capture tool. To use it, open the app using Windows’ Search function. Start by creating a new “sniping” by clicking the New button, then drag the cursor to cover the area of the screen that you want to capture. The Print Screen or PRT SC button on your keyboard gives you a quick way to take screenshots. There are a few different ways that you can use the Print Screen button to take a screenshot. Windows’ Snipping Tool is a handy way to take screenshots in Windows 10.
To save the file, paste the screenshot into any program that allows you to insert images, like Microsoft Word or Paint. The easiest way to take a screenshot on Windows 10 or Windows 11 is with the Print Screen key. https://mommabe.com/ To capture your entire screen, simply press PrtScn on the upper-right side of your keyboard. Taking screenshots on Windows 7,8 or 10 is a fun process that doesn’t require you to be a tech geek. Each method of creating screenshots we described in this article is equally effective, so anyone can choose the one they find the most convenient.
When you’re done, you’ll be shown your video clip. If this makes you uncomfortable, consider a different software. When you reach this startup screen, choose “Record Your Screen”. After all the setup, you can get started with a basic screen capture. First, put OBS in “Studio Mode” so that the left side says ‘preview’ and the right side says ‘live’. Before you get started, you’ll need to download OBS Studio from their website here.


